TabViewってのを使うとタブが使えるって聞いたけど実際やってみると味気もないゴミみたいなものができました。 もうちょっと、っぽい感じにしたいので色々調べて見て手探りでやってみました。

もういったんこれでいいや
タブをタップした際の表示するページを設定する
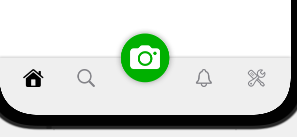
真ん中のカメラは…タブで表示というよりカメラ起動的なものなので、今回処理を当てないことにして、残り4つをタップした時に、何かしらそれぞれ表示するような分岐を作って今回は終わりにしたいと思います。
さっきのタブを並べた部分の上に、selectedに入ってるものに応じてswitchでもあてておきます。
////ContentView.swift  にて

GeometryReader{geometry in

 VStack{
////選択によって、表示するものを切り替える部分
  Spacer()
  switch viewRouter.currentPage{
   case .home:
    Text("ホームです")

   case .search:
    Text("検索です")

   case .notification:
    Text(通知です)

   case .settings:
    Text("設定です")

   }

  Spacer()

  HStack{
   TabBarIcon(viewRouter:viewRouter,selected:.home,width:geometry.size.width/6,height:geometry.size.height/24,systemIconName:"house.fill",tabName:"ホーム")
   TabBarIcon(viewRouter:viewRouter,selected:.search,width:geometry.size.width/6,height:geometry.size.height/24,systemIconName:"magnifyingglass",tabName:"検索")

   ZStack{

    Circle()
    .foregroundColor(Color.white)
    .frame(width:geometry.size.width/6,height:geometry.size.height/6)
    .shadow(radius:4)

    Image(systemName:"camera.circle.fill")
    .resizable()
    .aspectRatio(contentMode:.fit)
    .frame(width:geometry.size.width/6,height:geometry.size.height/6)
    .foregroundColor(Color(red: 0/255, green: 185/255, blue: 0/255, opacity: 1.0))

    .onTapGesture{
    }

   }
////本来並ぶところを、縦にずらす
.offset(y:-geometry.size.height/20)

   TabBarIcon(viewRouter:viewRouter,selected:.notification,width:geometry.size.width/6,height:geometry.size.height/24,systemIconName:"bell",tabName:"通知")
   TabBarIcon(viewRouter:viewRouter,selected:.settings,width:geometry.size.width/6,height:geometry.size.height/24,systemIconName:"wrench.and.screwdriver",tabName:"設定")
  }
  .frame(width:geometry.size.width,height:geometry.size.height/10)
  .background(Color("TabBarBackground").shadow(radius:2))

 }
 .edgesIgnoringSafeArea(.bottom)

}////geometory
ひとまずここまでで。
このswitchのところに、他ファイルでのviewを作って参照させたりするだけでページが切り替わるらしい
1 2